Today’s Poses: Pigeon and Thread the Needle Pose
Pigeon and Thread the Needle Pose
Pigeon Pose
Pigeon Pose is a hip opener forward bend. There are three primary versions of Pigeon Pose, each building upon the one before. This version is the first stage and it is the one you will commonly practice in yoga class. The next is Mermaid Pose and the full pose is One-Legged King Pigeon (Eka Pada Rajakapotasana). Expect to spend some time getting comfortable in each pose before moving to the next step.
Steps
- Begin by getting into Marjariasana (Cat stretch).
- Breathe out and bring your right knee forward to touch the right wrist.
- Bending the knee, bring your ankle near the groin region. Now slide the right foot towards the left hand, till the toes touch the left wrist.
- Slide the left leg back so that it touches the floor. Keeping the knee straight, ensure that the front of the foot is touching the ground, while the sole faces the ceiling.
- Lower your right buttock to the floor and press your tailbone forward to lengthen your lower back.
- You may strengthen the lower back further by pushing your fingertips firmly to the floor.
- Take a few deep breaths in this position.
- Taking support of your hands, slide your left knee forward while exhaling and get back into the Cat stretch.
- Stay in Cat stretch and take a couple of deep breaths and repeat the process with the other leg.
Benefits
- It stretches the entire lower part of the body, stimulates the abdominal organs and helps relieve the body of Sciatica.
- It helps open up the hips and adds more flexibility to the hip region.
- It is also known to relieve the body of stress and anxiety.
Thread the Needle
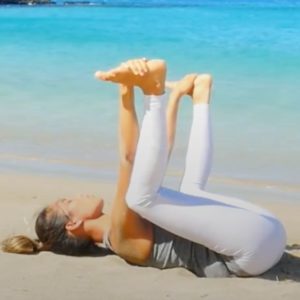
Thread the Needle pose (Sucirandhrasana), also known as Eye of the Needle or Figure 4 pose, is much less intense than Pigeon pose, but just as effective for opening the hips, and safer for those with any limitations such as knee or hip issues. Try practicing the pose both at the start and the end of class and notice what difference you feel in the sense of spaciousness in the body.
Steps
- Begin lying comfortably on the back. Bend your knees and place the soles of your feet flat down on the mat, about hip-distance apart. Walk your heels in toward your body until you can just graze the heels with the fingertips.
- Cross your right ankle on the left thigh, just below your bent knee, keeping the right foot flexed and active so that the toes of the right foot are pointing back toward the right knee. Ensure that you keep your right foot flexed throughout the pose to protect the knee joint from injury.
- Lengthen your tailbone down toward the ground to maintain the natural curve of the low back, and find the action of pressing your right knee away from your body.
- Thread your right arm through the space created between the legs, and interlace your fingers around the front of the left shin, or the back of the left thigh. Use the strength of your arms to gently pull your left leg closer to your chest while keeping your hips square.
- Keep the back of the head down and the backs of the shoulders relaxed down on the mat. Release any tension you may be held in the neck.
- Remain in the pose anywhere from 5-25 breaths. To come out of the pose, exhale to release the left leg and slowly lower the soles of both feet down onto the mat. You can gently rock the knees from side to side to release any tension, then come back to center and repeat on the other side.
Benefits
- Thread the Needle Pose is a safe and effective way to stretch the hips, particularly the piriformis muscle.
- Releasing tension in the hips helps to create a sense of physical ease throughout the entire body, particularly in the knees and low back, as well as mental ease and clarity.
- Practicing Thread the Needle pose often can produce a marked sense of openness in the hips in preparation for deeper poses such as Full Lotus (Padmasana) and Pigeon (Eka Pada Rajakapotasana).
- This is also great prep work for arm balances like Flying Pigeon (Eka Pada Galavasana) and Grasshopper!


